How to Decorate a Headband
A beaded headband is the easiest and most satisfying way to add a does of sparkle to you holiday look. Here are some tips and ticks for your Genevieve Rose Atelier DIY Beaded Headband Kit.
If you don't have a DIY kit you can easily buy colored headbands and beads online (we love Etsy for supporting our fellow independent makers).
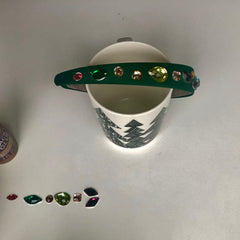
We suggest grabbing your favorite holiday mug to help hold your headband level while the glue dries.
First take a moment to arrange the stones on the table in front of you in a pattern that you like. This helps ensure you space the beads over the whole headband. We like a symmetrical pattern but we encourage you to go for an arrangement that you love!


Lean the headband on the mug to support it, keeping it as level as possible. We're going to glue the beads onto just the top level section first. By glueing onto only the level section we're stopping the beads from sliding around before the glue dries. Leave the glue to dry before moving on to the next section.
Next, rotate the headband so one of the sides is facing up, keeping it as level as possible. Glue the beads on this section and allow to dry.
Lastly, rotate the headband to the other side and glue the beads on there. Allow to dry before you remove the headband from the mug. 

If you enjoyed this kit why not try one of our other DIY beret or headband kits?