Embroidered Raffia Sun Hat - How To
Summer is on its way but until it arrives you might find yourself in need of a fun winter activity. Why not prepare for the summer ahead by personalizing your very own sun hat with some bright and fun raffia embroidery.
Here are some tips and ticks to help you with your Genevieve Rose Atelier DIY Raffia Sunhat with Embroidery Kit. If you don't have a kit the same techniques can be applied to most straw hats with a sturdy embroidery needle and some raffia ribbon.
First gather together your materials and get a pair of scissors. Think about what shapes you would like to embroider on your hat - where will they go and what size will they be? The instruction booklet in your kit has lots of ideas but feel free to let your imagination run wild. And may we suggest a summery cocktail or two to get you in the mood?

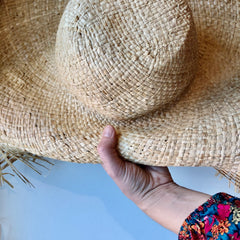
Before we begin with the embroidery here are some tips on how to hold your hat while embroidering. We know the wide brim and frayed edge can be a little awkward to handle!
Gently roll the brim under and hold loosely with your non-needle hand. Try not to squeeze or squash the brim. On the underside aim to hold the sweatband out of the way so you don't embroider into it. With a little practice you should be able to hold the brim and sweatband in one handful.

Thread your needle and tie a knot (or double knot) about half an inch from the end.


We like to start the embroidery from the outside and make a feature of the knot. You can trim down the tail of the knot if it looks too long. While stitching aim to strike a balance between gently pulling the threads securely flat, and not pulling too hard which can cause the straw to rip.


You can tie off your ends inside the hat by looping through an existing thread and tying a knot.
Or make a feature of the knot like we did at the beginning by tying off at the front. To do this, loop your thread through some existing embroidery and tie a knot. You want the knot to sit nice and flush against the hat so as you are pulling the knot tight use your fingernail to push the knot against the hat.


Congratulations! You have a personalized sun hat ready endless summer adventures.

If you enjoyed this embroidered hat project check out our other DIY hat and headband kits, and don't forget to share your sunhat style @genevieveroseatelier.
-
Genevieve Foddy
