Arrow Fat Left Icon Arrow Fat Right Icon Arrow Right Icon Cart Icon Close Circle Icon Expand Arrows Icon Instagram Icon Pinterest Icon Hamburger Icon Information Icon Down Arrow Icon Mail Icon Mini Cart Icon Person Icon Ruler Icon Search Icon Shirt Icon Triangle Icon Bag Icon Play Video

How To

Raffia Sunhat with Tassels - DIY Kit How To

Summer is just around the corner and we're already dreaming of beach days and barbecues and picnics in the park with friends. And a new hat!

Here is everything you need to know to personalize a fabulous summer hat with colorful tassels, and a step-by-step guide to our new DIY Raffia Sunhat with Tassels Kit.

First gather together your DIY Kit, a small bowl of water and a pair of scissors - a sharp and pointy pair is best. 

How to Make Tassels - Raffia Sun Hat Kit by Genevieve Rose Atelier 

Choose the thread color you would like to use for the body of your first tassel. Using the little cardboard template wrap the thread around the card about 8-10 times. 

How to Make Tassels - Raffia Sun Hat Kit by Genevieve Rose Atelier How to Make Tassels - Raffia Sun Hat Kit by Genevieve Rose Atelier 

Snip open the threads at the bottom of the card. you now have a bundle of threads (more or less!) all the same length. Hold them carefully near the middle so they stay a nice, tight bundle. 

How to Make Tassels - Raffia Sun Hat Kit by Genevieve Rose Atelier How to Make Tassels - Raffia Sun Hat Kit by Genevieve Rose Atelier 

Choose a contrasting thread color. Place the tail end of the contrasting thread at about the middle of the main bundle. Start wrapping the second thread around your first bundle, starting about 3/8 inch from the centre, and wrap the contrasting thread towards the center. The idea is to wrap the second thread over its beginning tail to secure in place. Try to place each wrap neatly next to the one before. You want to wrap quite firmly. 

How to Make Tassels - Raffia Sun Hat Kit by Genevieve Rose Atelier How to Make Tassels - Raffia Sun Hat Kit by Genevieve Rose Atelier 

Take another contrasting thread and repeat the process, this time covering the middle of the main bundle and once again wrapping the thread over its own starting tail. 

How to Make Tassels - Raffia Sun Hat Kit by Genevieve Rose Atelier How to Make Tassels - Raffia Sun Hat Kit by Genevieve Rose Atelier How to Make Tassels - Raffia Sun Hat Kit by Genevieve Rose Atelier How to Make Tassels - Raffia Sun Hat Kit by Genevieve Rose Atelier 

Repeat again with a third color, wrapping down the other side from the centre (to about 3/8 inch from center). 

How to Make Tassels - Raffia Sun Hat Kit by Genevieve Rose Atelier  How to Make Tassels - Raffia Sun Hat Kit by Genevieve Rose Atelier 

Fold your main bundle in half and wrap the third color around the whole main bundle, just under all the colored threads. This will secure the tassel shape into place. Tie off with a knot and trim the tail. Also trim any excess colored tails that didn't get completely wrapped.  

How to Make Tassels - Raffia Sun Hat Kit by Genevieve Rose Atelier How to Make Tassels - Raffia Sun Hat Kit by Genevieve Rose Atelier 

You can add a fourth color over the top of this section if you like. This time leave the beginning tail free so you can use it to tie a knot with the end of this color when you have finished wrapping. 

How to Make Tassels - Raffia Sun Hat Kit by Genevieve Rose Atelier How to Make Tassels - Raffia Sun Hat Kit by Genevieve Rose Atelier  How to Make Tassels - Raffia Sun Hat Kit by Genevieve Rose Atelier

You'll probably notice your tassel has a rather uneven bottom edge so let's give it a haircut! Get your bowl of water and dip the tassel strands into the water (up to the bottom of the colored wrappings) Squeeze out the excess water and smooth the tassel strands. 

How to Make Tassels - Raffia Sun Hat Kit by Genevieve Rose Atelier How to Make Tassels - Raffia Sun Hat Kit by Genevieve Rose Atelier 

While still wet, trim the bottom of the tassel strands in a straight line. Leave the tassel to dry. Repeat the whole process and make a second tassel! As you can see here we made 2 tassels with different color combinations. 

How to Make Tassels - Raffia Sun Hat Kit by Genevieve Rose Atelier How to Make Tassels - Raffia Sun Hat Kit by Genevieve Rose Atelier 

Once your tassels are dry you need to assemble your hat. Gather together your hat, tassels, ribbon, needle + thread and scissors. 

How to Make Tassels - Raffia Sun Hat Kit by Genevieve Rose Atelier

First tie the ribbon around your hat. It helps to do this while you are wearing the hat so you don't accidentally tie the ribbon too tight. We like to tie a double knot on the right side of the hat (fun fact: millinery tradition says that women's hats are trimmed on the right and men's hats on the left). 

 How to Make Tassels - Raffia Sun Hat Kit by Genevieve Rose Atelier How to Make Tassels - Raffia Sun Hat Kit by Genevieve Rose Atelier

Now thread your needle with the sewing thread, double over the thread and tie a good knot in the end. From the inside of the hat going towards the outside sew a few stitches through the ribbon to help hold it in place. (We sew just under the knot).

Make sure when you're holding the hat you are holding the sweat band out of the way - you don't want to sew through it!

How to Make Tassels - Raffia Sun Hat Kit by Genevieve Rose Atelier How to Make Tassels - Raffia Sun Hat Kit by Genevieve Rose Atelier 

Now we will attach the tassels. Make sure you have a nice long double thread on your needle with a knot in the end. Sew this thread from the inside of the hat working towards the outside. 

Sew through one tassel near the centre top. 

Sew the thread back though the hat so that the tassel is hanging on a loop of thread. Don't pull too tight! You want the tassel the have a little bit of movement. You can see in the photo below the tassels are dangling a little bit. 

How to Make Tassels - Raffia Sun Hat Kit by Genevieve Rose Atelier How to Make Tassels - Raffia Sun Hat Kit by Genevieve Rose Atelier 

Repeat with the second tassel. Tie off your thread securely on the inside of the hat. 

How to Make Tassels - Raffia Sun Hat Kit by Genevieve Rose Atelier How to Make Tassels - Raffia Sun Hat Kit by Genevieve Rose Atelier 

With double sewing thread and a knot in the end sew a few stitches through the opposite side of the ribbon and though the hat. This will stop the ribbon moving or riding up on the other side of the hat. 

How to Make Tassels - Raffia Sun Hat Kit by Genevieve Rose Atelier Genevieve Rose Atelier DIY Raffia Sun Hat with Tassels Kit

Voila! Your personalized sunhat with colorful tassels is ready for summer adventures. 

If you enjoyed this craft project why not try one of our other DIY hat, headband or beret kits. And don't forget to share your sunhat style @genevieveroseatelier


Continue reading

Embroidered Raffia Sun Hat - How To

Summer is on its way but until it arrives you might find yourself in need of a fun winter activity. Why not prepare for the summer ahead by personalizing your very own sun hat with some bright and fun raffia embroidery. 

Here are some tips and ticks to help you with your Genevieve Rose Atelier DIY Raffia Sunhat with Embroidery Kit. If you don't have a kit the same techniques can be applied to most straw hats with a sturdy embroidery needle and some raffia ribbon.

First gather together your materials and get a pair of scissors. Think about what shapes you would like to embroider on your hat - where will they go and what size will they be? The instruction booklet in your kit has lots of ideas but feel free to let your imagination run wild. And may we suggest a summery cocktail or two to get you in the mood?

Genevieve Rose Atelier DIY Embroidered Sun Hat Kit

Before we begin with the embroidery here are some tips on how to hold your hat while embroidering. We know the wide brim and frayed edge can be a little awkward to handle! 

Gently roll the brim under and hold loosely with your non-needle hand. Try not to squeeze or squash the brim. On the underside aim to hold the sweatband out of the way so you don't embroider into it. With a little practice you should be able to hold the brim and sweatband in one handful. 

Genevieve Rose Atelier DIY Embroidered Sun Hat Kit Genevieve Rose Atelier DIY Embroidered Sun Hat Kit

Thread your needle and tie a knot (or double knot) about half an inch from the end.

Genevieve Rose Atelier DIY Embroidered Sun Hat Kit Genevieve Rose Atelier DIY Embroidered Sun Hat Kit

We like to start the embroidery from the outside and make a feature of the knot. You can trim down the tail of the knot if it looks too long. While stitching aim to strike a balance between gently pulling the threads securely flat, and not pulling too hard which can cause the straw to rip. 

 Genevieve Rose Atelier DIY Embroidered Sun Hat Kit Genevieve Rose Atelier DIY Embroidered Sun Hat Kit 

You can tie off your ends inside the hat by looping through an existing thread and tying a knot. 

Or make a feature of the knot like we did at the beginning by tying off at the front. To do this, loop your thread through some existing embroidery and tie a knot. You want the knot to sit nice and flush against the hat so as you are pulling the knot tight use your fingernail to push the knot against the hat. 

Genevieve Rose Atelier DIY Embroidered Sun Hat Kit Genevieve Rose Atelier DIY Embroidered Sun Hat Kit Genevieve Rose Atelier DIY Embroidered Sun Hat Kit Genevieve Rose Atelier DIY Embroidered Sun Hat Kit  

Congratulations! You have a personalized sun hat ready endless summer adventures. 

Genevieve Rose Atelier DIY Embroidered Sun Hat Kit

If you enjoyed this embroidered hat project check out our other DIY hat and headband kits, and don't forget to share your sunhat style @genevieveroseatelier.

Continue reading

How to Make a Pompom - DIY Pompom Beret Kit

Pompom making is a fun and easy activity for a cozy weekend and pompoms are our favorite way to trim a jaunty beret!

If you have a Genevieve Rose Atelier DIY Pompom Beret Gift Kit, here are the step-by-step instructions for making your pompom.

You will need your pompom making kit and your own tape and a pair of scissors - a long, sharp pair is best.

Cut along the outside of the two pompom template circles.
DIY Pompom Beret Kit by Genevieve Rose Atelier DIY Pompom Beret Kit by Genevieve Rose Atelier 
Place the circles on top of each other. 
Make a cut from the outside edge straight towards the center circle. 
Cut out the center circle.
DIY Pompom Beret Kit by Genevieve Rose Atelier DIY Pompom Beret Kit by Genevieve Rose Atelier 
Place a piece of tape on the cut to join up the donut. 
Place the two donuts on top of each other, lining up the taped cuts.
DIY Pompom Beret Kit by Genevieve Rose Atelier DIY Pompom Beret Kit by Genevieve Rose Atelier 
Prepare your yarn: 
*First cut off a 12 inch piece of yarn and set it aside. Do not wrap this piece. It will be used for tying up the pompom at the end. 

The rest of the yarn is for wrapping and it is easier to work with if it's cut into 2-3 yard lengths. You can then fold these into 3 so you're essentially working with several strands at once (this is faster than working with a single strand at a time).

Place the bottom of your first piece of wrapping yarn on the inside edge of your donut, holding in place with your thumb. 
Wrap the yarn around your donut, wrapping over the starting place of the yarn to lock it in place.  
DIY Pompom Beret Kit by Genevieve Rose Atelier DIY Pompom Beret Kit by Genevieve Rose Atelier 
Keep wrapping around and around until you can hardly fit any more yarn through the center circle. 
Each time you start a new piece of wrapping yarn make sure it is wrapped on top of itself to hold it in place, like we did at the beginning. 
DIY Pompom Beret Kit by Genevieve Rose Atelier DIY Pompom Beret Kit by Genevieve Rose AtelierGently make a gap on the outside edge of your wrapped donut to expose the two cardboard pieces. 
Place the tip of your scissors BETWEEN the two cardboard donuts and cut the yarn the whole way around the edge. 
DIY Pompom Beret Kit by Genevieve Rose Atelier DIY Pompom Beret Kit by Genevieve Rose Atelier DIY Pompom Beret Kit by Genevieve Rose Atelier DIY Pompom Beret Kit by Genevieve Rose Atelier 
Get the 12 inch piece of yarn you set aside at the beginning. 
Gently separate the two cardboard donuts and place the 12 inch piece of yarn between the two pieces of card. 
Wrap the piece of yarn a couple of times around the middle of your pompom, pulling fairly tight - but be careful not to break it!
DIY Pompom Beret Kit by Genevieve Rose Atelier DIY Pompom Beret Kit by Genevieve Rose Atelier 
Tie a couple of knots to secure. 
Find the taped up cuts in the donuts and gently remove the tape. 
DIY Pompom Beret Kit by Genevieve Rose Atelier DIY Pompom Beret Kit by Genevieve Rose Atelier 
Gently pull apart the donuts and remove them from the middle of your pompom. 
You now have a pomom with a long string. Well done!
DIY Pompom Beret Kit by Genevieve Rose Atelier DIY Pompom Beret Kit by Genevieve Rose Atelier 
Your pompom probably looks quite shaggy so give it a little trim - be careful not to cut the long yarn strings, we're going to use them to attach the pompom to the beret. 
Thread your needle with one of the long yarn strings. 
It helps to first twist the yarn really tight and then bend it into a little loop between your thumb and pointer finger. 
DIY Pompom Beret Kit by Genevieve Rose Atelier DIY Pompom Beret Kit by Genevieve Rose AtelierDIY Pompom Beret Kit by Genevieve Rose Atelier DIY Pompom Beret Kit by Genevieve Rose Atelier 
Sew this first yarn string though the middle of the beret. 
Repeat with the other yarn string. 
Turn your beret over and tie the two yarn strings together.
DIY Pompom Beret Kit by Genevieve Rose Atelier DIY Pompom Beret Kit by Genevieve Rose Atelier 
Trim the two yarn strings (not too short) and voila! your pompom beret is finished and ready to wear. 
DIY Pompom Beret Kit by Genevieve Rose Atelier DIY Pompom Beret Kit by Genevieve Rose Atelier

If you enjoyed this pompom project check out our other DIY beret and headband kits, and don't forget to share your beret style @genevieveroseatelier  


Continue reading
How to Cover a Headband - DIY Plaid Headband Kit

At Genevieve Rose Atelier we love a classic headband, and we love being able to personalize a headband with interesting and beautiful fabric. Here you'll find a step-by-step guide for your Genevieve Rose Atelier DIY Plaid Headband Kit. If you get bug for covering headbands like us, this method works for covering most headbands in just about any fabric!

If you have a DIY Kit
The fabric and lining cutting is already cut out for you. Your instructions begin further down. You will need your DIY Kit and a mug or something to stand the headband up on later. 

If you don't have a Kit you will need: 
12 inch square fabric, 3 x 15 inch piece microsuede, plastic headband, paper and pen, glue, 6 small binder clips, beads to decorate, a mug or something to stand the headband up on.  

Non-DIY Kit instructions begin here
Trace around the plastic headband on the paper to make a template. 

Place the template on your fabric at a 45 degree angle from the straight sides (for the fabric fans out there, we're placing the template on the bias of the fabric which will help the fabric stretch into a nice smooth covering on the headband).
Trace around the template and then draw another line adding a half inch 'seam allowance' width all around the template. Taper this width down to quarter of an inch at each end of the template.

Mark the center of the template on the fabric. Mark the center on the underside of the headband.

Cut out the fabric on the outer line (template + 'seam allowance' or half/quarter inch)
DIY Plaid Headband Kit by Genevieve Rose AtelierDIY Plaid Headband Kit by Genevieve Rose Atelier

DIY Plaid Headband Kit by Genevieve Rose Atelier

DIY Kit instructions begin here!

Place the headband on the fabric matching up the headband with both the outline on the fabric and the center markings.

Without glue, fold under one side of the fabric at the center and secure with a binder clip. This will stop the unglued side moving too much while we work on the other side.

How to Cover a Headband in Fabric - Genevieve Rose Atelier

Squeeze a thin line of glue along the other long edge of the headband. It's easier to glue one side at a time. 

Fold the extra fabric under at the center and add a binder clip to hold it in place. 

How to Cover a Headband in Fabric - Genevieve Rose AtelierDIY Plaid Headband Kit by Genevieve Rose Atelier
Fold under one end of the fabric and add a binder clip to hold in place.

Be careful you don't pull the fabric too much or you won't have enough when you do the other side. Continue to use the headband outline on the fabric as a guide.

DIY Plaid Headband Kit by Genevieve Rose AtelierDIY Plaid Headband Kit by Genevieve Rose Atelier
Gently fold under and smooth out the fabric between the center and end clips. Again don't pull too hard! Add a binder clip in the middle of this section.


DIY Plaid Headband Kit by Genevieve Rose AtelierDIY Plaid Headband Kit by Genevieve Rose Atelier
You should end up with one side folded neatly under and held in place with 5 binder clips.You should have an even amount of fabric left over on the un-glued side, and ideally your headband outline will still be visible on the underside of the unglued side. 
You might need to periodically pat down the glued fabric until it dries. 
It works best if you now leave this side to dry before glueing on the other side. 

Repeat the glue and binder clip process on the second side. 
Leave to dry.
DIY Plaid Headband Kit by Genevieve Rose Atelier
To neatly cover the ends of your headband, squeeze some glue into the little fabric pock at the end, and also on the underside tip of the headband. 
Fold the fabric flap to the underside of the headband pulling gently to smooth and tighten and add a binder clip to hold in place.
Repeat with the other end. 
Leave to dry.
DIY Plaid Headband Kit by Genevieve Rose AtelierDIY Plaid Headband Kit by Genevieve Rose AtelierDIY Plaid Headband Kit by Genevieve Rose Atelier
To add the lining
If you do not have a kit, trace your template on the back of the microsuede lining. Do not add any extra width, instead cut out your template a tiny bit smaller than the traced outline. 
Mark the center on the underside of the lining.

Place your microsuede lining on the underside of the headband matching up the center markings. 
Place a binder clip on either side at the center to hold the lining in place.
Peel back and hold one half of the lining. 
DIY Plaid Headband Kit by Genevieve Rose AtelierDIY Plaid Headband Kit by Genevieve Rose Atelier
Cover the underside of the headband in a thin amount of glue, from the center to the end, extending almost to the side edges. 
Slowly and carefully lower the lining onto the glue, starting from the center and smoothing flat against the headband as you go.
DIY Plaid Headband Kit by Genevieve Rose AtelierDIY Plaid Headband Kit by Genevieve Rose Atelier
Repeat with the other side remembering to move the binder clips to add glue under them.
Give one more gentle smooth the the whole lining and leave to dry. 
DIY Plaid Headband Kit by Genevieve Rose AtelierDIY Plaid Headband Kit by Genevieve Rose Atelier
Congratulations! You now have a covered headband. 
DIY Plaid Headband Kit by Genevieve Rose AtelierDIY Plaid Headband Kit by Genevieve Rose Atelier
If you would like to add beads to your headband, first lean it on a mug or something similar to keep it still and horizontal as you work.
To prevent the beads from sliding around before the glue is dry, add them to just the top horizontal section, allow to dry and then rotate the headband and add to the next section. 
DIY Plaid Headband Kit by Genevieve Rose AtelierHow to Cover a Headband in Fabric - Genevieve Rose AtelierHow to Cover a Headband in Fabric - Genevieve Rose Atelier

If you enjoyed this headband project check out our other DIY beret and headband kits, and don't forget to share your headband style @genevieveroseatelier

Continue reading

How to Embroider a Beret - DIY Beret Embroidery Kit

 Embroidery is fun and easy way to personalize your accessories. If you have a Genevieve Rose Atelier DIY Embroidered Beret Gift Kit here are some ideas for how to beautify your beret. But don't let these idea limit you - use your imagination and the ingredients in the kit to create something truly unique!

You will need your DIY Embroidered beret kit and your own pair of scissors. 

If you don't have a kit you can easily buy yourself some embroidery floss (the insiders' name for embroidery thread), a needle (we like a chenille needle) and gather up some scissors and embroidery ideas. 

Hot tip - the embroidery you're about to see can be done on a felt fedora or beanie you might already have and want to jazz up.

How to use one of the templates

The DIY kit comes with a number of templates you can use for your embroidery. First cut out the template you would like to use. Here we're using the maple leaf.DIY Embroidered Beret Kit by Genevieve Rose Atelier DIY Embroidered Beret Kit by Genevieve Rose Atelier 
Pin the template onto the beret. Thread your needle and tie a know in the end of your thread.
Stitch around the template with one color. We made out stitches as long as each little pointy side of the leaf. Tie a knot at the end of the last stitch. 
Remove the template. 
If you like, use a contrasting color to stitch around the inside of the first line of embroidery. 
DIY Embroidered Beret Kit by Genevieve Rose Atelier DIY Embroidered Beret Kit by Genevieve Rose Atelier 
We wanted to do overlapping maples leaves so we took the same template and place it half way off the first embroidered maple leaf. 
Stitch around this half leaf in a contrasting color. 
DIY Embroidered Beret Kit by Genevieve Rose Atelier DIY Embroidered Beret Kit by Genevieve Rose Atelier 
Repeat another half leaf on the other side. 
Et voila! You have a lovely bouquet of maples leaves. 
DIY Embroidered Beret Kit by Genevieve Rose Atelier DIY Embroidered Beret Kit by Genevieve Rose Atelier

How to embroider a snowflake

Use the illustrations in your instruction booklet as a guide. 
Thread your needle and tie a knot at the end of the thread.
It's easiest if you first make the 6 long points. There's no need to cut and knot the thread after each point, just keep sewing and all the funny cross-over threads will be hidden on the underside of the beret. 
DIY Embroidered Beret Kit by Genevieve Rose Atelier DIY Embroidered Beret Kit by Genevieve Rose Atelier 
Next, go up and down each long point adding the little points (again don't cut and knot the thread, just keep sewing).
Try experimenting with different sizes of snowflake, or try using one color for the long points and a different color for the little points. 
DIY Embroidered Beret Kit by Genevieve Rose Atelier

If you enjoyed this embroidery project check out our other DIY headband and beret kits. And don't forget to share your beret style @genevieveroseatelier


Continue reading

How to Decorate a Headband

A beaded headband is the easiest and most satisfying way to add a does of sparkle to you holiday look. Here are some tips and ticks for your Genevieve Rose Atelier DIY Beaded Headband Kit. 

If you don't have a DIY kit you can easily buy colored headbands and beads online (we love Etsy for supporting our fellow independent makers). 

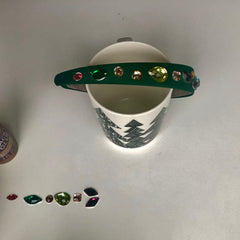
We suggest grabbing your favorite holiday mug to help hold your headband level while the glue dries. 

First take a moment to arrange the stones on the table in front of you in a pattern that you like. This helps ensure you space the beads over the whole headband. We like a symmetrical pattern but we encourage you to go for an arrangement that you love!

DIY Beaded Headband Gift Kit by Genevieve Rose Atelier DIY Beaded Headband Gift Kit by Genevieve Rose Atelier 
Lean the headband on the mug to support it, keeping it as level as possible. We're going to glue the beads onto just the top level section first. By glueing onto only the level section we're stopping the beads from sliding around before the glue dries. Leave the glue to dry before moving on to the next section. 

Next, rotate the headband so one of the sides is facing up, keeping it as level as possible. Glue the beads on this section and allow to dry. 

Lastly, rotate the headband to the other side and glue the beads on there. Allow to dry before you remove the headband from the mug. 
DIY Beaded Headband Gift Kit by Genevieve Rose Atelier DIY Beaded Headband Gift Kit by Genevieve Rose Atelier

If you enjoyed this kit why not try one of our other DIY beret or headband kits?

Continue reading

DIY Applique Beret Kit

We love felt! We can't think of anything better than adding a little felt applique to a felt hat or wooly beret. If you have a Genevieve Rose Atelier DIY Applique Beret Kit here are some ideas to get your started with your beret personalization. 

You will need your DIY kit, pen and paper and scissors. 

If you don't have a DIY kit you can easily buy squares of crafting felt online or at a craft store. These applique ideas can also be added to any felt fedora or wooly beret you might want to spruce up. 

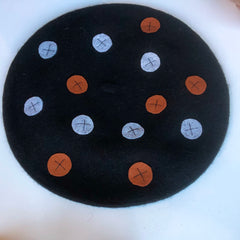
Felt Polka Dot Beret

For this applique idea we have used only 2 colors of felt. 
Take a quarter coin or similar size circle, place on the felt and trace around with a pen.
DIY Applique Felt Beret Gift Kit by Genevieve Rose Atelier DIY Applique Felt Beret Gift Kit by Genevieve Rose Atelier 
Cut out each little felt circle. 
One at a time, place each circle on the beret (be sure the pen marks are facing the beret so they can't be seen).
Thread your needle and tie a knot in the end of the thread. 
DIY Applique Felt Beret Gift Kit by Genevieve Rose Atelier DIY Applique Felt Beret Gift Kit by Genevieve Rose Atelier 
Sew on each felt dot with a large cross. Instead of trying to hide the stitching we like making a feature of the thread by using a contrasting color and large cross shape. 

If you feel more comfortable you can pin each dot in place on the beret before sewing it down. 

There's no need to cut and knot the thread after sewing each dot, just continue sewing the next one. The big lines of thread will be hidden on the underside of the beret. But do knot and cut the thread after sewing on the last dot.
Of course, if you prefer, you can knot and cut the thread after sewing on each dot. 

(The dots can be glued onto the beret but they will stay attached much, much better if they are sewn on). 
DIY Applique Felt Beret Gift Kit by Genevieve Rose Atelier DIY Applique Felt Beret Gift Kit by Genevieve Rose Atelier

 Applique Felt Initials

We wanted to make our initials the full height of the felt squares so we first traced the felt on a piece of paper (to make sure the letters fit).
DIY Applique Felt Beret Gift Kit by Genevieve Rose Atelier DIY Applique Felt Beret Gift Kit by Genevieve Rose Atelier 
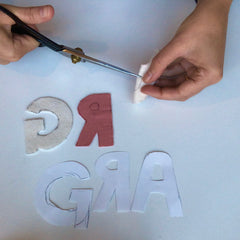
Draw your initials as tall and wide as you like on the paper and cut them out.
DIY Applique Felt Beret Gift Kit by Genevieve Rose Atelier DIY Applique Felt Beret Gift Kit by Genevieve Rose Atelier 
Place the letters UPSIDE DOWN on the felt - this ensures the pen marks we're about to make won't be visible on the letters. 
DIY Applique Felt Beret Gift Kit by Genevieve Rose Atelier DIY Applique Felt Beret Gift Kit by Genevieve Rose Atelier 
Trace around the letters and cut them out. 
DIY Applique Felt Beret Gift Kit by Genevieve Rose Atelier DIY Applique Felt Beret Gift Kit by Genevieve Rose Atelier
To cut out the center bits of letters like A, R, B, D etc fold the letter in half, make a little snip in the center bit and then cut out and remove the center portion. 
DIY Applique Felt Beret Gift Kit by Genevieve Rose Atelier DIY Applique Felt Beret Gift Kit by Genevieve Rose Atelier 
Turn your letters the right side up (notice the pen marks are now on the bottom where they can't be seen).
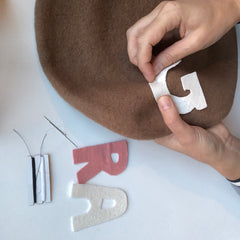
Pin the letters to the beret.
DIY Applique Felt Beret Gift Kit by Genevieve Rose Atelier DIY Applique Felt Beret Gift Kit by Genevieve Rose Atelier 
Thread your needle and tie a knot in the end of the thread. 
Sew the letter onto the beret. Instead of hiding the stitching we like to make a feature of it by using a contrasting thread color and using big visible stitches. 

If you feel more comfortable pin one letter at a time, using several pins on the same letter.  
(The letters can be glued onto the beret but they will stay attached much, much better if they are sewn on). 
DIY Applique Felt Beret Gift Kit by Genevieve Rose Atelier DIY Applique Felt Beret Gift Kit by Genevieve Rose Atelier

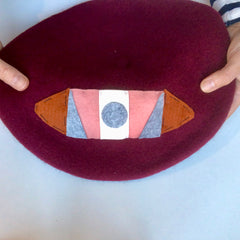
Art Deco Inspired Geometric Panel

Release your inner designer with this free-form style.
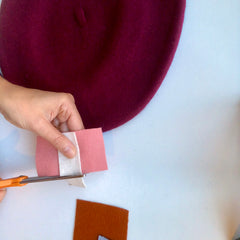
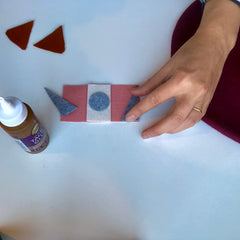
We invented a panel of geometric shapes in contrasting felt colors. 

Cut out and arrange your pattern before glueing or sewing anything. 
It helps to take a photo of your design before glueing or sewing in case you forget how you wanted it to look (we have learned this the hard way!)
DIY Applique Felt Beret Gift Kit by Genevieve Rose Atelier DIY Applique Felt Beret Gift Kit by Genevieve Rose Atelier 
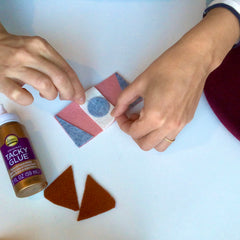
Cut the tip off your glue. Glue each piece onto the base panel, one at a time. 
When you have finished glueing leave the whole panel to dry. 
DIY Applique Felt Beret Gift Kit by Genevieve Rose Atelier DIY Applique Felt Beret Gift Kit by Genevieve Rose Atelier DIY Applique Felt Beret Gift Kit by Genevieve Rose Atelier DIY Applique Felt Beret Gift Kit by Genevieve Rose Atelier
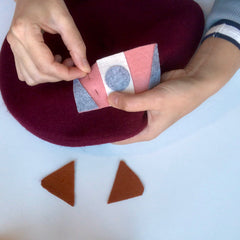
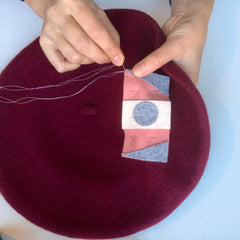
When dry, pin the panel onto the beret. 
Thread your needle and tie a knot in the end of the thread. 
Sew around the whole panel, tying a knot in the thread at the end. 
Instead of trying to hide the stitching we like to use a contrasting thread color and big stitches to make a feature of the sewing. 
DIY Applique Felt Beret Gift Kit by Genevieve Rose Atelier DIY Applique Felt Beret Gift Kit by Genevieve Rose Atelier
Pin and sew any remaining shapes onto the beret. These two little bronze triangles were not glued onto the main panel so we sewed them on separately. 

(The panel can be glued onto the beret but it will stay attached much better if sewn on). 
DIY Applique Felt Beret Gift Kit by Genevieve Rose Atelier DIY Applique Felt Beret Gift Kit by Genevieve Rose Atelier

If you enjoyed this applique felt project try one of our other DIY beret or headband kits, and don't forget to share your beret style @genevieveroseatelier

Continue reading